Implementing CyberSource Payments: A Developer’s Experience
Integrating a payment gateway is an important part of many modern applications. Whether you are building an e-commerce platform, a SaaS product, or any system that processes payments, choosing a reliable payment solution is critical.
Recently, I worked on integrating Cybersource, a payment platform owned by Visa Inc. that provides APIs for payment processing, fraud management, and transaction reporting. It allows developers to securely process online payments and connect with banks and card networks worldwide.
This article shares my experience implementing CyberSource payments, the challenges I faced, and a few lessons that may help both beginner and experienced developers.
Understanding CyberSource
CyberSource provides REST APIs, SDKs, and hosted checkout solutions that developers can use to integrate payment processing into their applications.
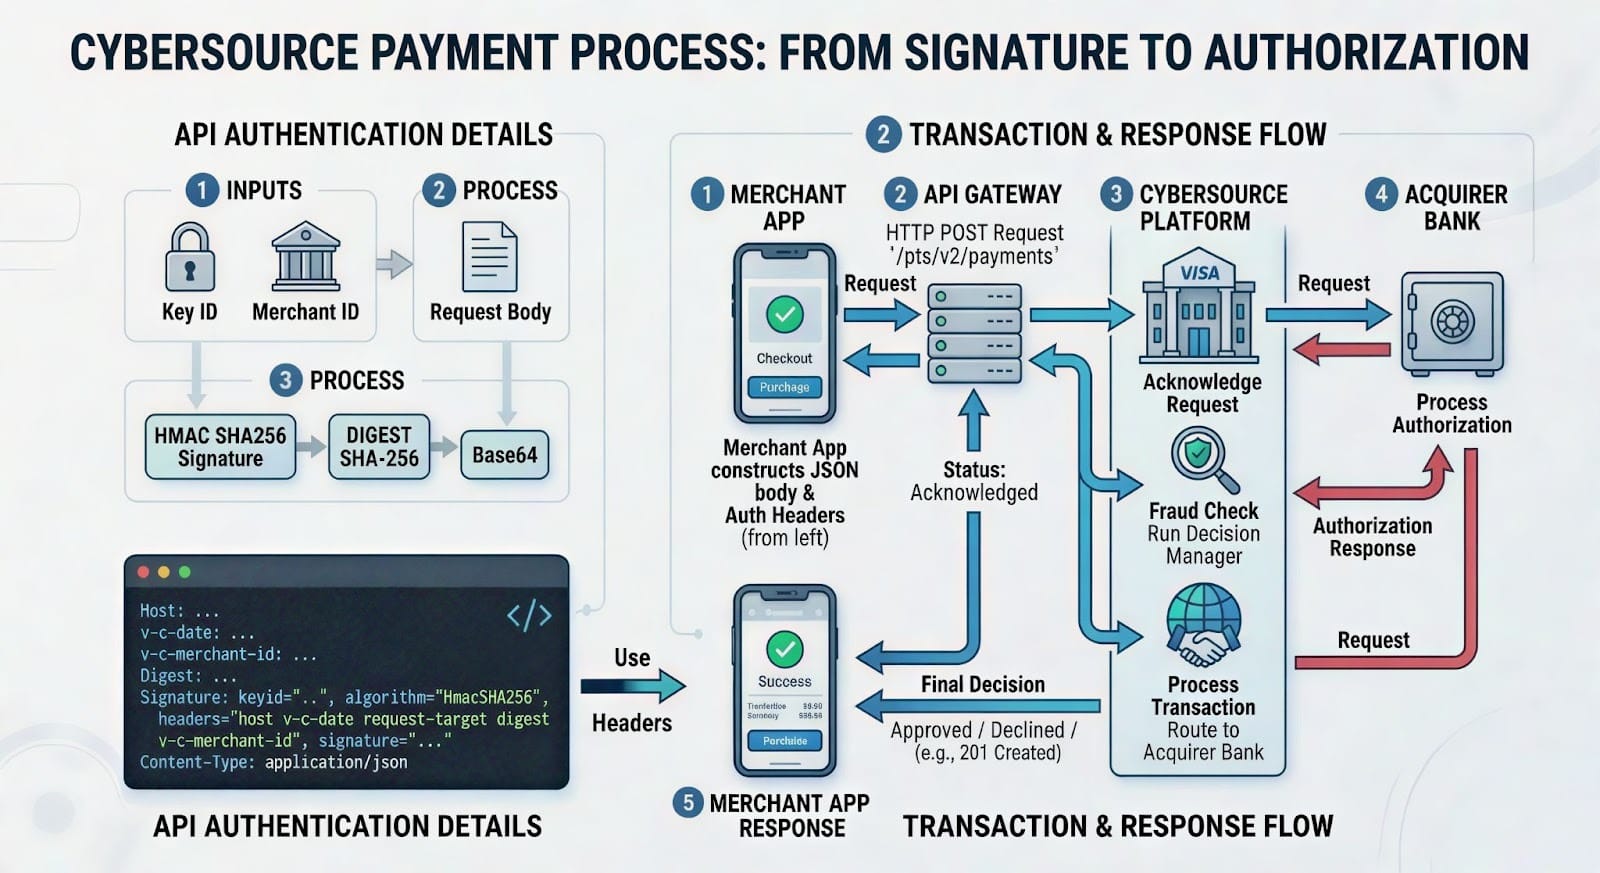
A simplified payment flow looks like this:
- Customer submits payment details.
- The merchant server sends a request to the CyberSource Payments API.
- CyberSource forwards the transaction to the payment processor and issuing bank.
- The bank approves or declines the transaction.
- The response is returned to the merchant application.
Understanding this flow helps developers design reliable payment systems and handle different payment scenarios properly.
The Challenge: Outdated Tutorials
When I first started the integration, I tried following a few YouTube tutorials to understand the process. Unfortunately, most of them were outdated and did not match the current CyberSource API implementation.
I also experimented with AI-generated examples, but some of them did not align with the latest authentication and request format required by the CyberSource REST API.
Eventually, I realized that the official CyberSource developer documentation and API Playground were the most reliable resources.
Basic Integration Steps
From my experience, the CyberSource integration can be simplified into the following steps.
1. Create a Developer Account
Register for a CyberSource developer account and access the sandbox environment for testing.
2. Choose an Integration Method
CyberSource supports multiple integration options:
- REST APIs
- SDKs for different languages
- Hosted checkout solutions
For backend integrations, the REST API approach provides the most flexibility.
3. Configure Authentication
CyberSource APIs require authentication using credentials such as:
- Merchant ID
- Key ID
- Shared Secret Key
Requests are authenticated using HTTP Signature with HMAC-SHA256.
4. Send Payment Requests
Your backend application sends a request containing:
- payment amount
- currency
- billing details
- card information
5. Handle Responses
Your system should handle responses like:
- successful payments
- declined transactions
- validation errors
- network failures
6. Test in Sandbox
Always test transactions in the sandbox environment before moving to production.
Testing with the CyberSource API Playground
CyberSource provides an API Playground that allows developers to test APIs directly from the browser.
https://developer.cybersource.com/api-reference-assets/index.html#static-home-section
In the playground you can:
- build API requests
- configure authentication
- test endpoints
- see request and response examples
Before sending requests, you must configure authentication.
Configure Authentication
In the Configuration tab, select:
HTTP Signature
Then enter your sandbox credentials:
- Organization ID
- Key (Key ID)
- Shared Secret Key
These credentials are generated from the CyberSource Business Center → Key Management.
The playground automatically generates request headers based on these credentials.
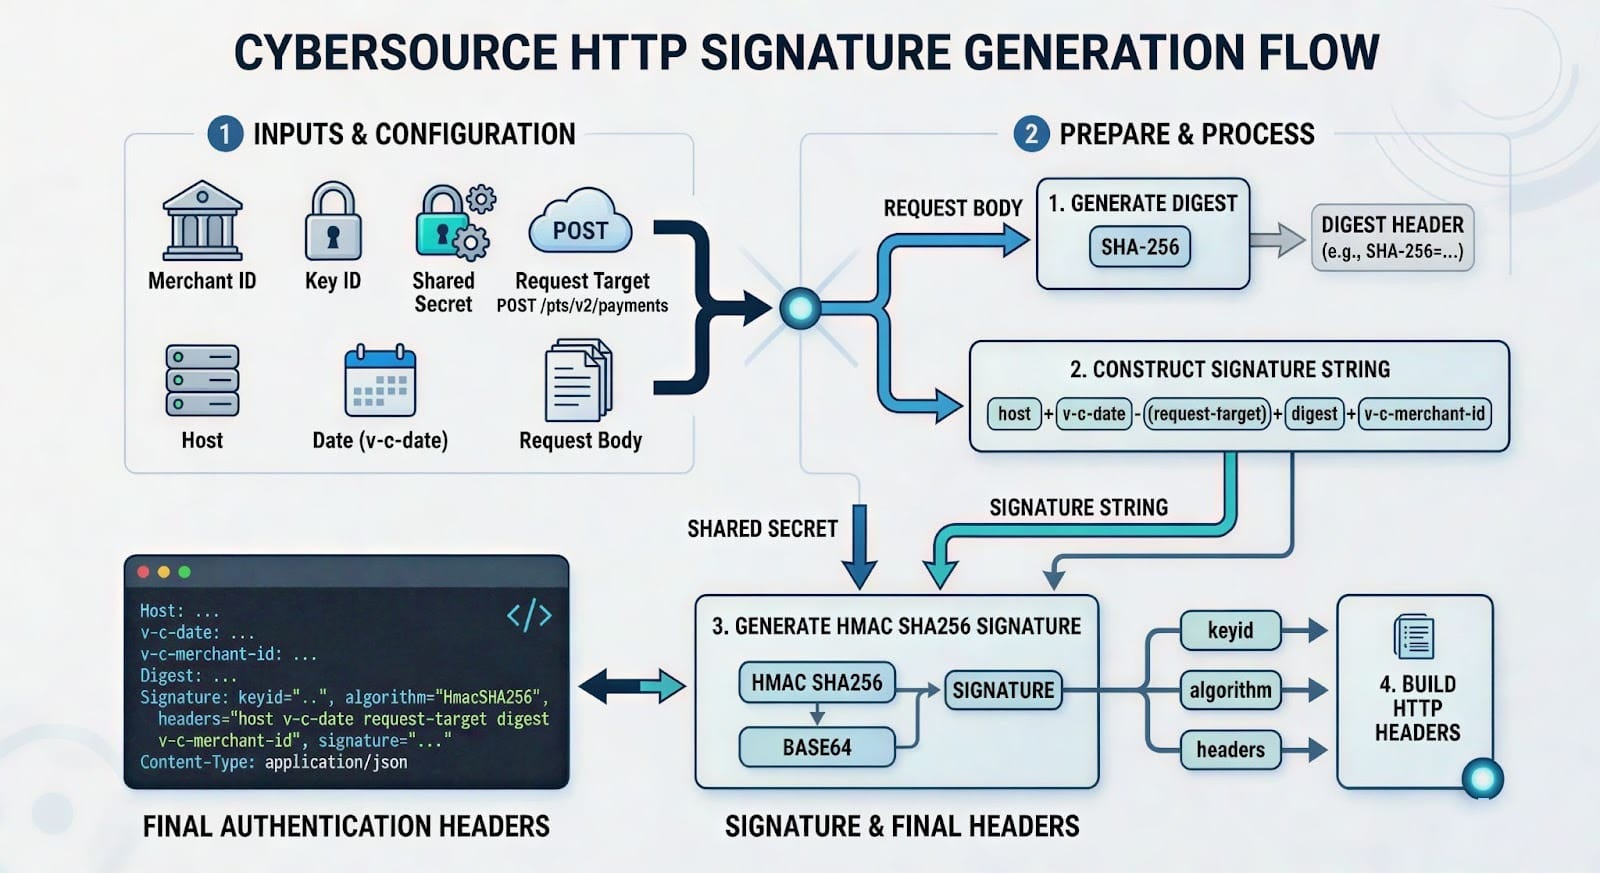
Understanding HTTP Signature Authentication
CyberSource REST APIs use HTTP Signature authentication with HMAC-SHA256 encryption.
Each request must include several headers:
Host
v-c-date
v-c-merchant-id
Digest
Signature
Content-Type
The signature is generated from the following values:
- host
- v-c-date
- request-target
- digest
- v-c-merchant-id
These values are combined into a string and signed using the shared secret key.
Step 1: Generate the Digest
The Digest header is created from the request body using SHA-256.
Example:
This ensures the request body has not been modified.
Step 2: Create the Signature String
Example:
Step 3: Generate the HTTP Signature
The signature is created using HMAC SHA256 and Base64 encoding.
Example header:
Example: Generate HTTP Signature (Node.js)
Diagram
Example Payment Request
Endpoint:
Diagram
Lessons Learned
During this integration, I learned several important things.
First, always rely on official documentation because payment APIs change frequently and older tutorials may no longer work.
Second, understanding HTTP Signature authentication is essential for working with the CyberSource REST API.
Third, the API Playground and sandbox environment are extremely helpful for testing requests before writing actual backend code.
Finally, security should always be a top priority. Sensitive card data should never be stored directly in your system unless you are fully compliant with PCI security standards.
Final Thoughts
Integrating Cybersource may feel complex at first, especially when dealing with authentication, request signatures, and payment flows. However, once you understand the API structure and testing tools, the integration becomes much easier.
Using the sandbox environment, API Playground, and official documentation can significantly simplify the development process.
For developers building payment-enabled applications, CyberSource provides a powerful platform for creating secure and scalable payment systems.